Enable, Create, and Edit Web Control Rules - ESET Protect
Enable and edit Web control
![]() Endpoint users: Perform these steps on individual client workstations
Endpoint users: Perform these steps on individual client workstations
- Open ESET PROTECT On-Prem in your web browser and log in.
Click Policies and select the Built-in policy that you want to modify. Select the check box next to the policy for client computers to which you want to apply Web control and click Actions → Edit.
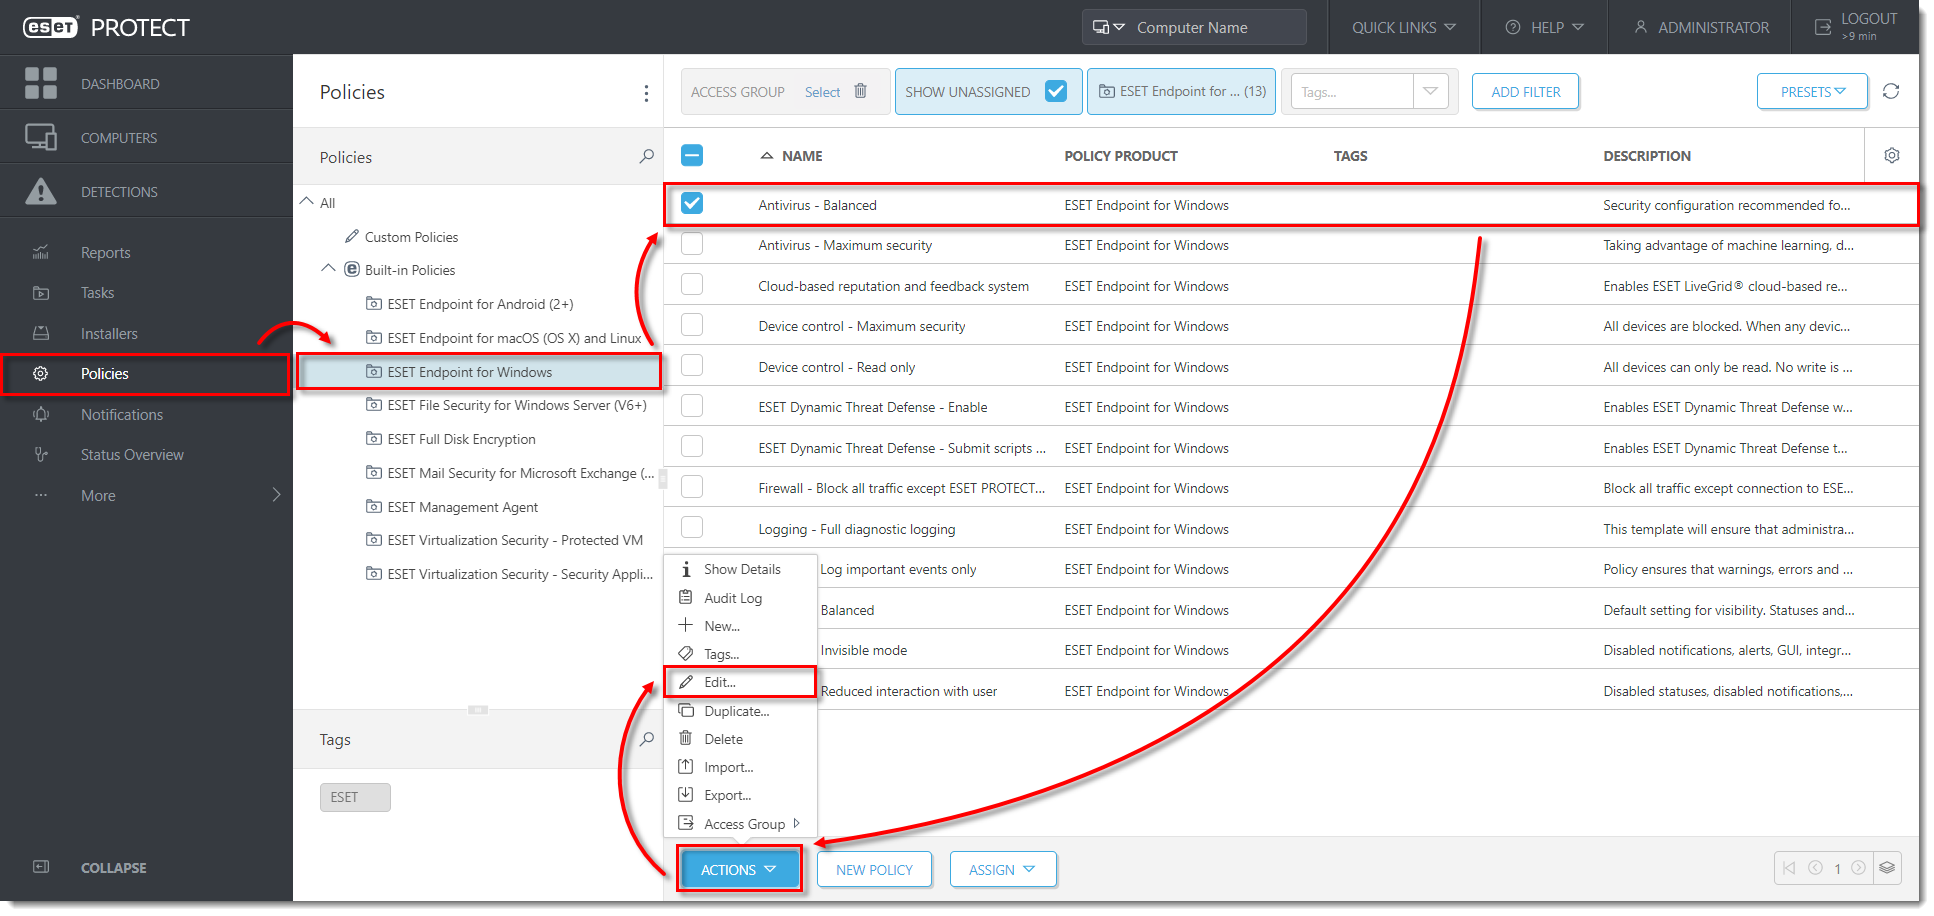
Figure 1-1 Click Settings → Web and Email → Web control and then click the toggle next to Enable Web control to enable it.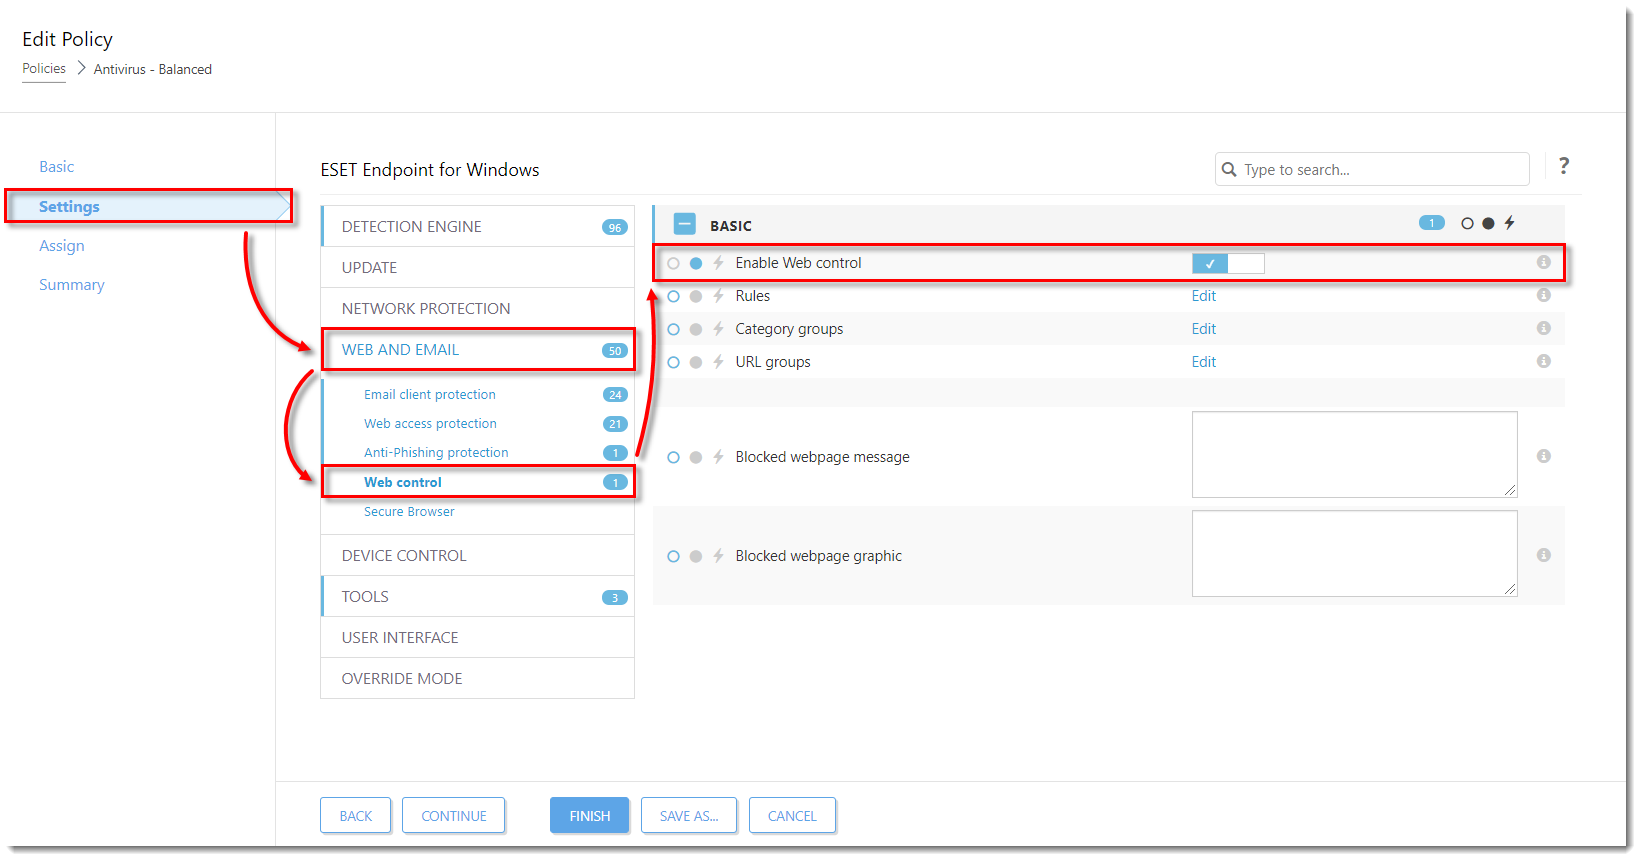
Figure 1-2 Click Edit next to either Rules, Category groups, or URL groups to modify the setting. See the sections below for a description of each setting and how to use it.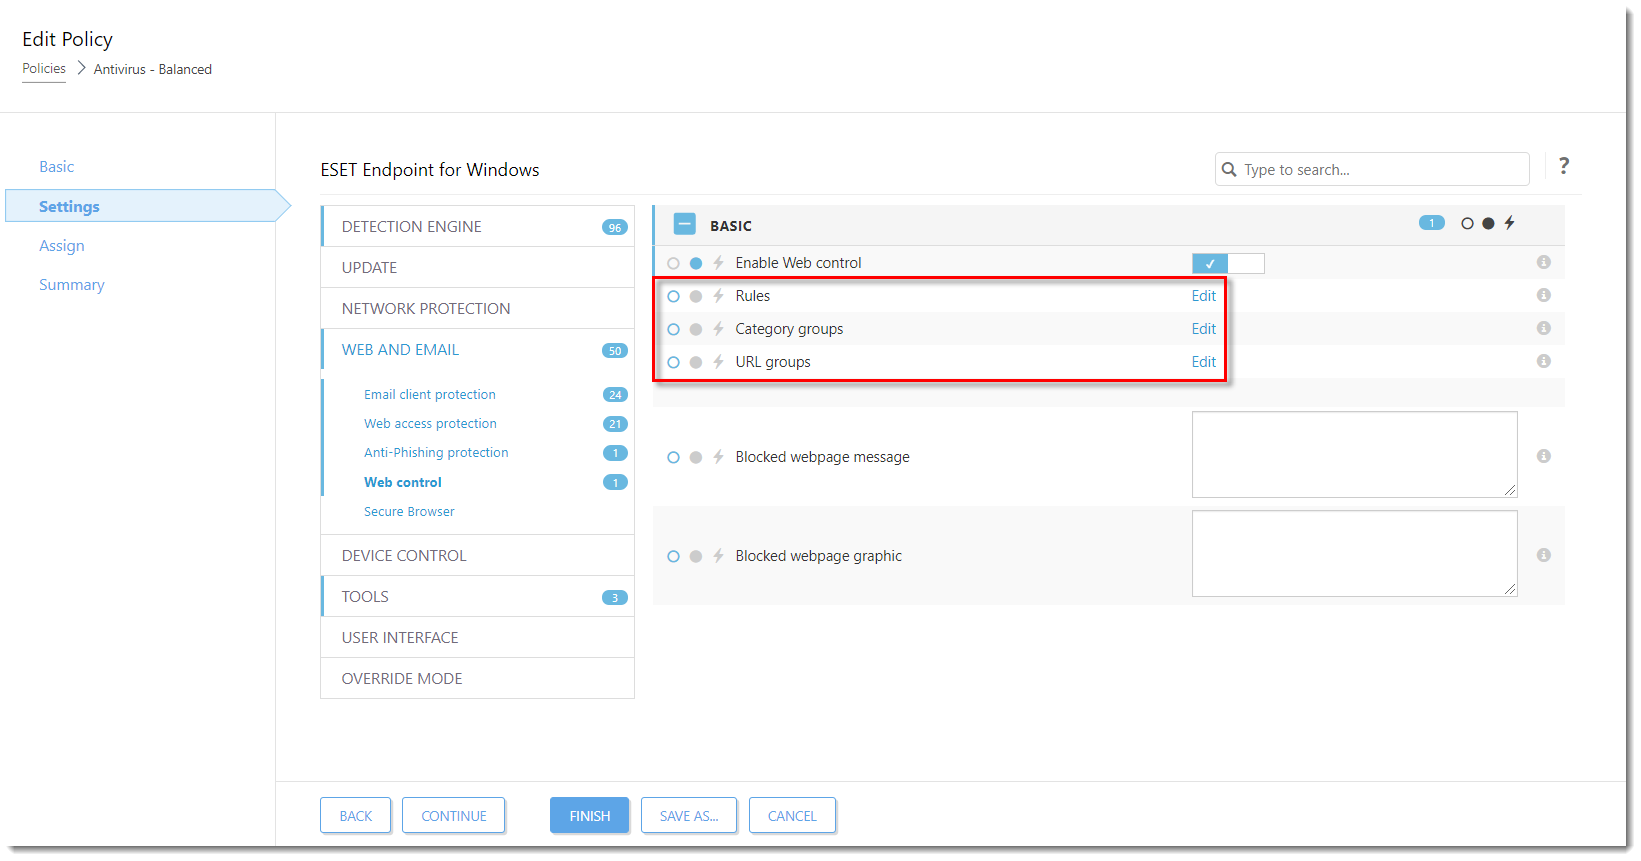
Figure 1-3
Manage Web control Rules
Manage the rules for a specific URL or category of web content.
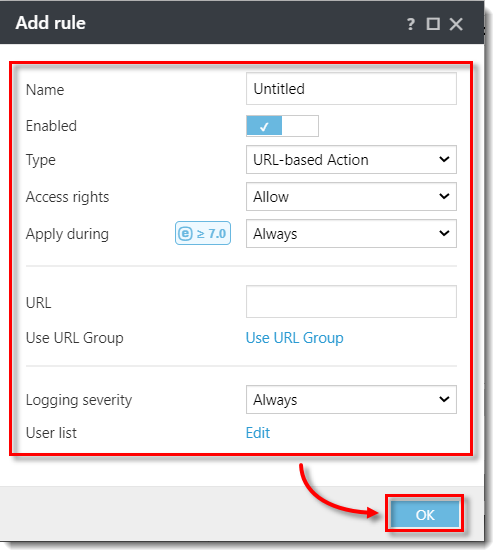
Click Edit next to Rules (see Step 4 of Section 1) to open a dialog and click Add to create a new rule.
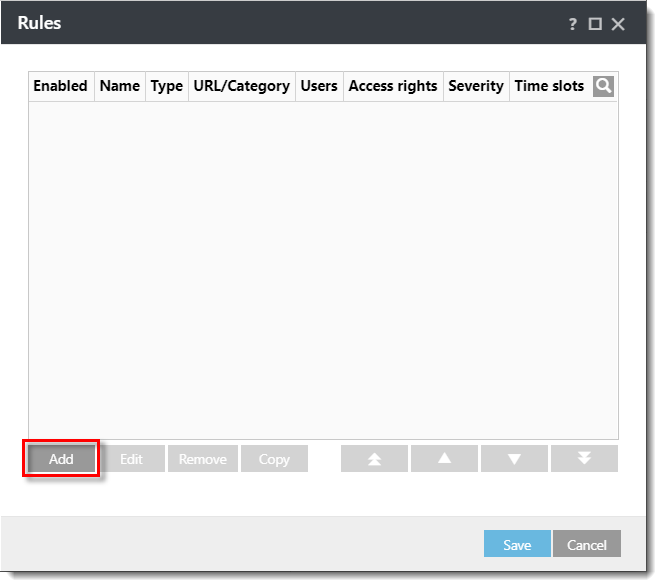
Figure 2-1The following settings are available in the Add rule dialog:
- Name: The name of the rule, used for editing in ESET PROTECT On-Prem.
- Enabled: Click the toggle to enable or disable the rule.
- Type: Set the rule to act on a URL or a category of web content.
- Access rights: Set the permitted access rights for this content to Allow, Warn or Block to have your ESET business product take the corresponding action when the specified content is accessed.
- Apply during: Set when the rule will be applied.
- URL or URL Group: Type the URL or use the drop-down menu to specify the target for this rule.
- Use URL Group: You can define groups of URLs to filter more web content using a single rule. Click to toggle URL Group instead of a single URL.
- Logging severity: Select the level of severity required for the logs to record when this rule is activated.
- User list: Specify the users to whom this rule applies
Manage Web control Category groups
Category groups allow you to group multiple URLs and URL categories together so you can target all of them using a single rule.
Click Edit next to Category groups (see Step 4 of Section 1) to open a dialog window and click Add to create a new category group. Type a name for the new category group and click OK.

Figure 3-1Click the group in the Groups section on the left side of the window. Select the check boxes next to a given category to select it and all its sub-categories (in this example, Adult Materials category is selected). Also, you can expand the category to display its sub-categories that can be selected by clicking their corresponding check boxes (in this example, Tobacco sub-category is selected in the Alcohol and Tobacco category). Click Save when you are finished selecting Category groups. 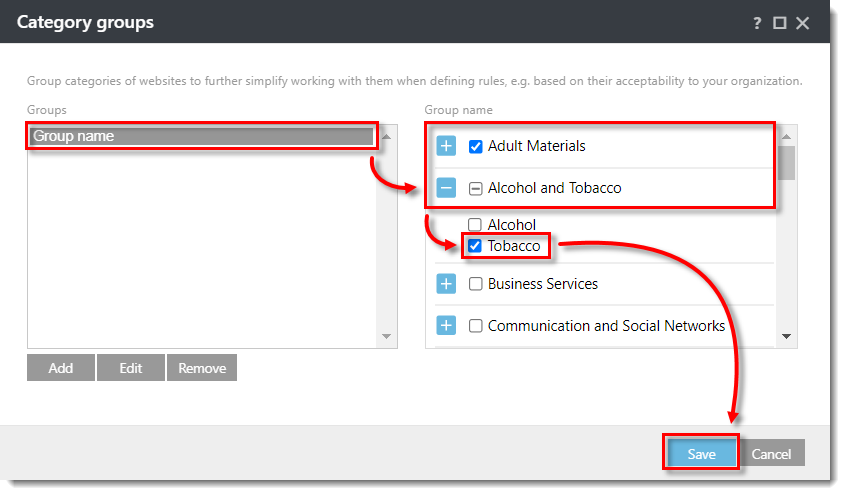
Figure 3-2
Manage Web control URL groups
URL groups allow you to group multiple blocked URLs and URL categories together so you can target all of them using a single rule.
Click Edit next to URL groups (see Step 4 of Section 1) to open a dialog window and then click Add to create a new URL group. Type a name for the new URL group and click OK.
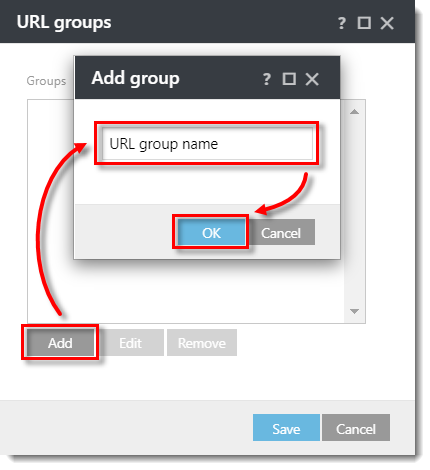
Figure 4-1Select the URL group and click Add on the right side of the window. 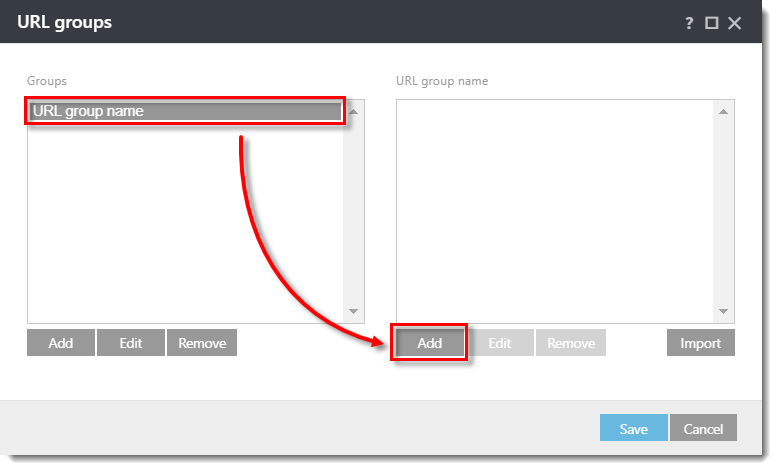
Figure 4-2Type a URL that you want to include in your new URL group. You can also click Enter multiple values in the bottom left corner to add more URLs at once. Type your URLs in the new dialog window. You can click the drop-down menu next to Separator for multiple values and select the way how the URLs will be separated from each other: New line (pre-selected), Comma, or Semicolon. Click OK when you are finished adding URLs. 
Figure 4-3Click Save to save your changes for URL groups. 
Figure 4-4
Add Blocked webpage message and Blocked webpage graphic
You can add a blocked webpage text message and graphics to the blocked webpage text message which will be displayed when a client computer attempts to access blocked content.
Type a message that you want to display in the Blocked webpage message field. Type a URL for the graphic in the Blocked webpage graphic field to display a graphic with your blocked content message. Click Finish to save your changes.

Jerome Antiado
ESET Technical Engineer
Related Articles
Add and modify Device Control Policy/rules. - ESET Protect
I. Add a Device control rule on client workstations using a policy in ESET PROTECT On-Prem Endpoint users: Perform these steps on individual client workstations In this example, we block access to all Bluetooth devices for all users. Open ESET ...Create a second Administrator in ESET Protect
Log in to ESET PROTECT Hub or ESET Business Account. Create a new ESET PROTECT user that needs Administrative access. Alternatively, you can edit the existing user. Click User management, hover the mouse cursor next to the name of an existing user ...Download, install and activate ESET Cyber Security
Issues Install ESET Cyber Security version 7 Solution Install ESET Cyber Security version 7 Uninstall any previously installed antivirus software on your system. Download version 7 of ESET Cyber Security and double-click the appropriate installer ...Enable ESET LiveGuard Advanced for ESET Mail Security
Enable and Configure ESET LiveGuard Advanced for ESET Mail Security - Log in to your ESET Protect Web Console. - Click Configuration/Policies → New policy. - Type a name for your policy. The Description field is optional. - Select the Product: In the ...ESET Bridge (ESET Proxy) Configuration
ESET Bridge requirements and supported products: https://help.eset.com/ebe/4/en-US/?requirements_and_supported_products.html Installation on Windows (standalone installer) Install ESET Bridge on a computer running a supported OS. 1.Visit the ESET ...
